Make sure your pretty ribbon is right where you need it with these easy Ribbon Storage Ideas for Spools! These simple tricks are such a game changer!
Then… have even more fun getting organized with these Home Organizing Tips and Tricks for the rest of your home!
![]()
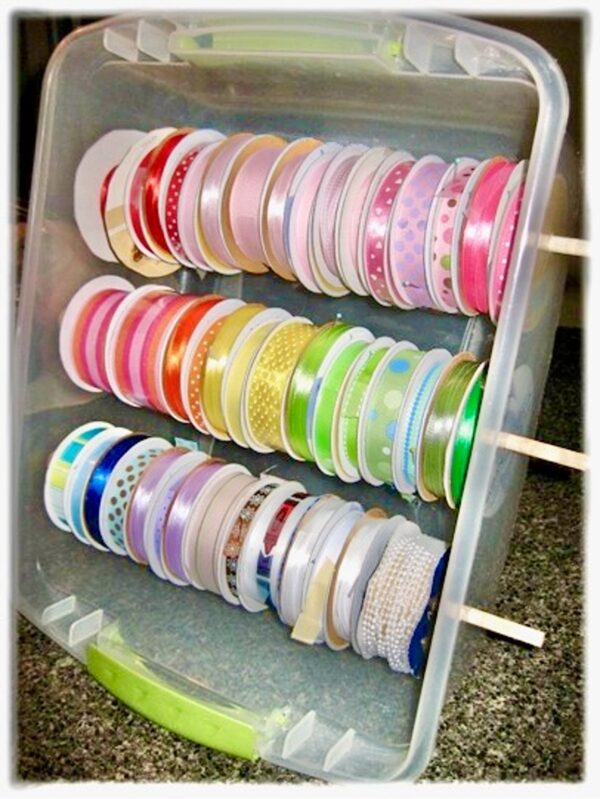
Ribbon Storage Ideas for Spools
On the hunt for some simple Ribbon Storage Ideas for Spools?? These creative ideas will have your wild ribbon organized and corralled in no time!
Samantha writes: "LOVE THIS! For someone like me who runs a flowershop and has ribbon of all sizes and designs coming out her ears, this is the most perfect way I have EVER found to organize my ribbons! Let me tell you when I say I have tried everything, I mean it!!! Thank you so much for this for idea."
If you’re anything like me, you’ve collected a lot of ribbon spools over the years, so taking a few minutes to get them organized once and for all is SO worth it!
It will make using your ribbon so much more fun, too!
So are you ready to get those ribbon spools all tidied up?
Here’s what you need to do…
Related: HUGE List of Fun Crafts to Do at Home
How to Store Ribbon Rolls
So are you ready to get those unruly rolls of ribbon tidied up? Here are my two favorite options for storing ribbon in your craft room or craft closet…

Supplies Needed for a Ribbon Dispenser Rack
You’ll just need a few simple supplies to make a plastic bin ribbon dispenser rack!
- Thick plastic container with a lid
- 5/16” wooden dowels
- A 5/16” drill bit and drill
- Wood glue or hot glue… or both.
- As many ¾ inch, wooden, screw-hole plugs as dowels (alternatively, Tinker Toys may fit these dowels. I think they would be adorable on both ends but glued on only ONE end.)
Tip from Kathy: I didn’t have the patience to let the wood glue set before loading the dowels up, so I also glued around the outside of the dowel with hot glue.
How to Make a Plastic Box Ribbon Storage Rack
Here’s what you’ll do…
1. Using your 5/16” drill bit, drill holes in the wooden screw-hole plugs but not all the way through.
2. Put some glue in the hole and attach your dowel. It should be a very tight fit. You can sand the dowel a little to make it fit if necessary (but it shouldn’t be ~ use some muscle!). 😉
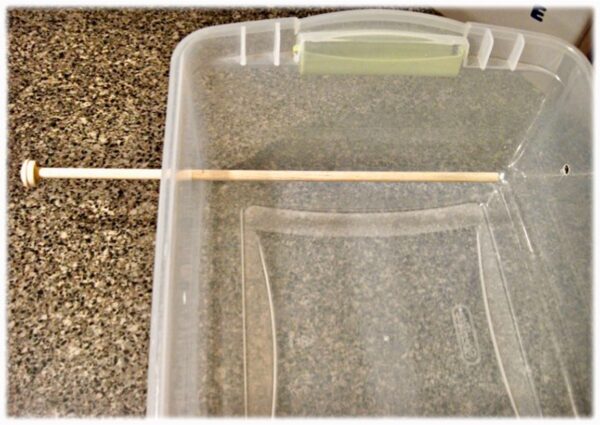
3. While your glue dries, measure a dowel to fit your container’s width so that they extend about one inch or so beyond the outside of the box.
4. Cut all dowels to your measurement. (they’re small enough that you can simply use a serrated knife to score around the dowel and then just snap it off.)
5. Measure and mark the spacing of the holes for your dowels on the box with a Sharpie.
6. On each side of the box, the holes should be approximately 2.5” from the short end of the box, approximately 2.5-3” down into the depth of the box, and a minimum of 5 inches away from each other going down the length of the box.
7. Use your ribbon spools to gauge the exact distance you would like them placed, just be sure that they match up on the opposite side.
8. Depending on the size of your box, mark as many holes as will fit dowels. (I used three dowels)
9. Using your 5/16” drill bit, drill the holes according to your marks.
10. When the glue is dry on your dowels, push the dowel through a hole in the box and load ‘em up with ribbon spools!

11. When full, put the dowel through the second, corresponding hole.
How to Secure Ribbon Ends
Pro Tip: Ribbon ends can be secured to the rest of the spool with either a small tab of tape or a sewing pin.
Wasn’t that SO easy? Thanks to frugal friend Kathy in Connecticut for sharing this creative Ribbon Storage Idea!
Now another fun way to store your ribbon is on a tiered pants hanger! Here’s what you’ll do…
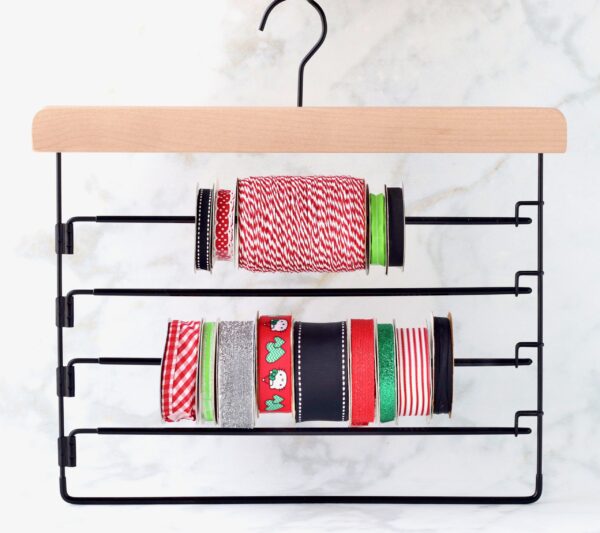
#2: How to Store Ribbon on Hangers
Here’s another fantastic tip from frugal friend Susan!
“Take a coat hanger that is meant to unclip for slacks, undo the clip, slide ribbon spools on the rod, clip back and put hangers wherever you want them! (Like the closet or a hook near your crafts) I like the wooden hangers but they also have metal ones. They are getting harder to find, but you can still locate them at Thrift shops, yard sales, and specialty closet-type stores.”
What You’ll Need for a Ribbon Storage Hanger
Here what you’ll need…
- 1 Tiered Pants Hanger (I picked this one up from Target)
- Spools of Ribbon
How to Make a Ribbon Hanger Organizer
Simply unhook an upper tier, and thread spools of ribbon on.
Repeat again on a lower tier, and you’re done! SO easy!
Fun Ribbon Craft Ideas
Want more crafting inspiration? Check these fun projects out…
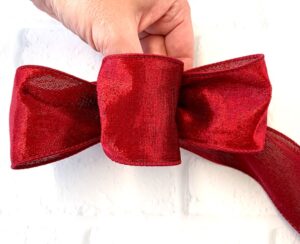
How to Make a Bow For a Wreath
Tips for How to Make Korker Hair Bows

How to Make Cute DIY Hair Clips for Babies and Little Girls
DIY Flower Hair Clips and Headbands
Christmas DIY Hair Clips
BIG List of DIY Hair Clips and Bows (Easy Tutorials)
Fun Crafts to Do at Home
So how do you store your craft supplies or ribbon?
Got a tip or trick??
Leave a comment & share!


The best part about this storage idea is that you can store your glue g*n, ruler, scraps, etc in the bottom. Put the lid on and it stays dust free! Genius!
looks really great but could it be done without need for drilling for those of us nervous of such tools?. I don’t have a man to ask. Lol Sturdy shoe boxes with string or Dowell threaded through might do similar thing, for smaller amounts of ribbon.
Can always cover the box with pretty paper. Ps I’ve not tried so just wondering. Also make a box whereby the ends of the rolls of ribbon are packed tight in and the end of each roll is poking out through a slot in the box so you can see it and just pull the ribbon and cut it to size. Would that work?
I saw another good idea at lifehack.com about organizing wrapping paper (which is the bane of my existence – even in those neat plastic storage bins the ends always unroll!) – take a used paper towel roll (just the cardboard) and slit up one side. Then wrap it around the wrapping paper roll and voila – it keeps the ends from flying free!
I did this for my yarn only I rolled the scrappy leftovers of yarn on toilet paper rolls and put them on dowels in a box.
Very cool idea thank you for sharing…
I cannot wait to make this. I also have the wire rack (mine form walmart), but I like the idea of this being portable. Sometimes late at night I craft in my bed while watching movies. This can go anywhere in the house.
Thanks
LOVE THIS! For someone like me who runs a flowershop and has ribbon of all sizes and designs coming out her ears this is the most perferct way i have EVER found to organize me ribbons! Let me tell you when i say i have tried everything i mean it!!! Thank you so much for this for idea. Love this website!!! 🙂
I love this idea, it is soooo creative. I have a blog for busy moms and I would love to share this on my blog with your premission of course. Can you email me if that is ok. Thanks!!!