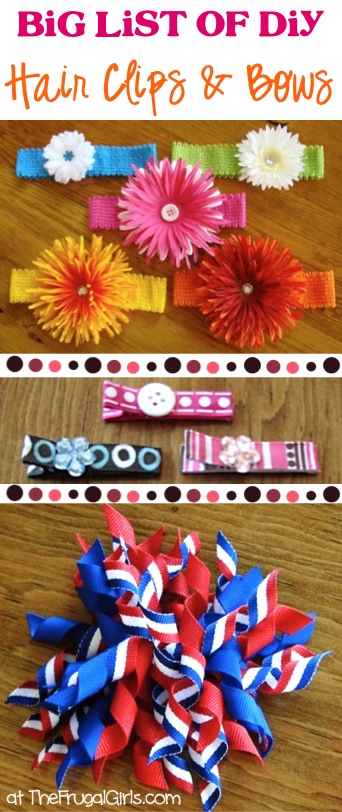
Making your own adorable DIY Hair Clips and Bows is going to be so easy with these simple step-by-step tutorials.
Then… indulge in even more fabulous crafting fun with some help from this HUGE List of Fun Crafts that Anyone Can Enjoy!
![]()
DIY Hair Clips and Bows Tutorials
Feeling crafty?? You’ll love this BIG List of Fun DIY Hair Clips and Bows!
They’re SO easy to make, and make super-cute gifts, too!
Related: Fun Crafts To Do that Anyone Can Enjoy
DIY Flower Hair Clips and Headbands
Start creating your own adorable headbands with these easy tutorial for How To Make Cute Flower Headbands for Babies and Little Girls!

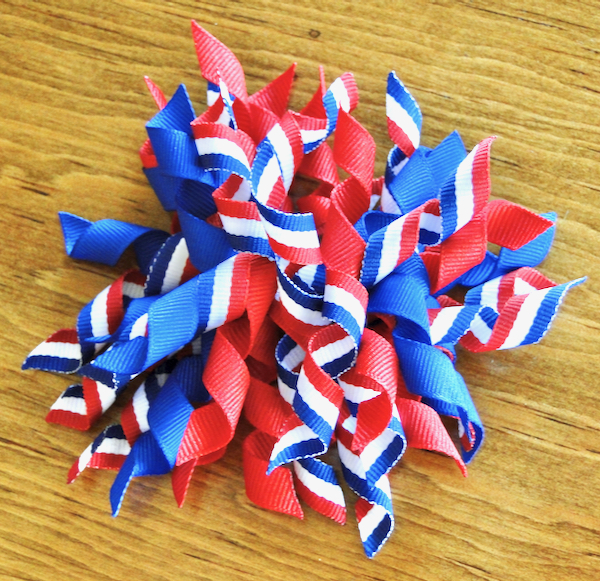
How to Make Korker Hair Bows
Learn how to make Korker Hair bows with this easy DIY tutorial!
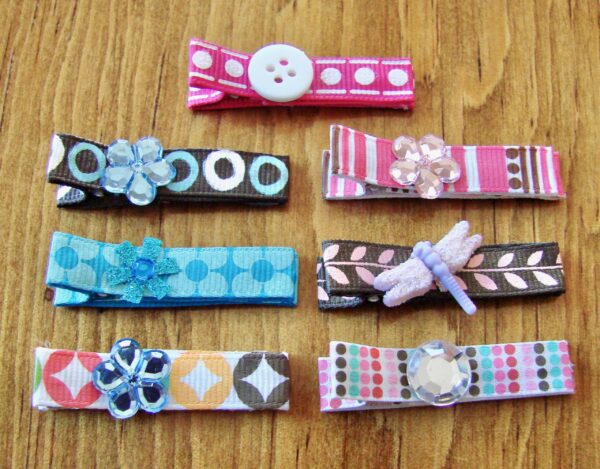
How to Make Cute Hair Clips for Babies and Little Girls!
Let me show you how to make DIY Hair Clips for Babies and Little Girls! I’ll even show you how to make variations just for Christmas and Valentine’s day!
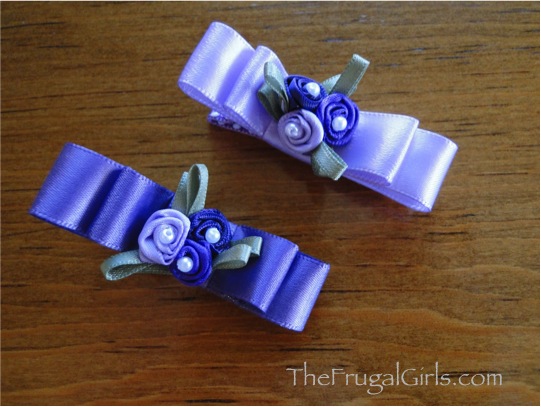
How to Make a Double Bow Hair Clip
You won’t believe how easy it is to make a double bow hair clips. Just follow these simple step-by-step instructions…
Double Bow Hair Clip Supplies
Here’s what you’ll need to round up to get started…
- Grosgrain ribbon (3/8″)
- Alligator Clip
- 5/8″ Smooth Ribbon
- Hot Glue G*n
- Pretty doo-dads for embellishing! 😉
Double Bow Hair Clip Instructions
Just follow these simple steps to create your own beautiful double bow hair clips…
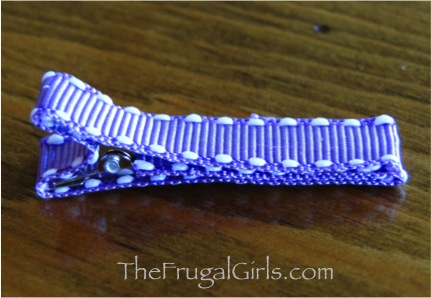
1. Glue 3/8″ ribbon to alligator clip, so you’ve got a cute little clippie to use as the base. (go here for step-by-step instructions)…
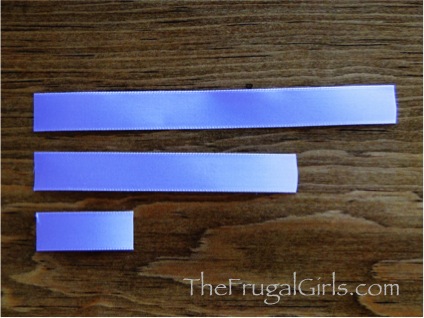
2. Cut 3 pieces of 5/8″ ribbon into these sizes: one 5 1/2″ long, one 4″ long, and one 1 1/2″ long.
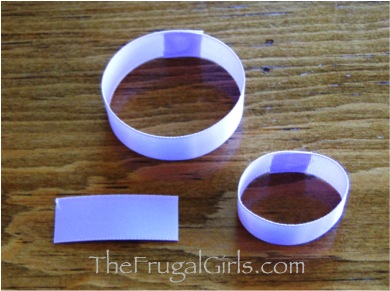
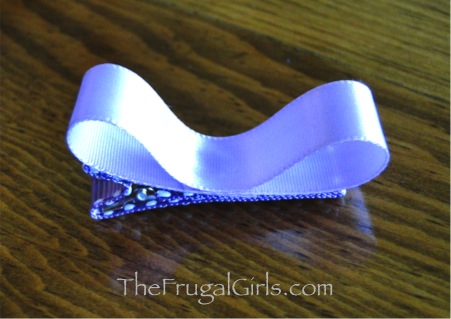
3. Glue the two longer pieces into two separate loops, like this…
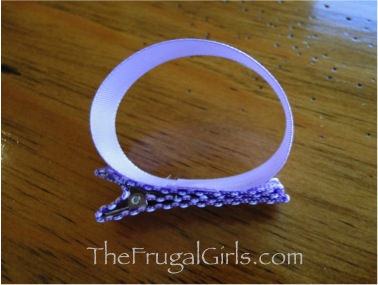
4. Glue the larger loop onto the top of the clippie, just like this…
5. Place a small dot of glue on the inside center piece of the loop, then press the top down, so it will look like this…
6. Now grab your smaller loop, and glue that on top of the clip (with just a small dot of glue in the center), just like this…
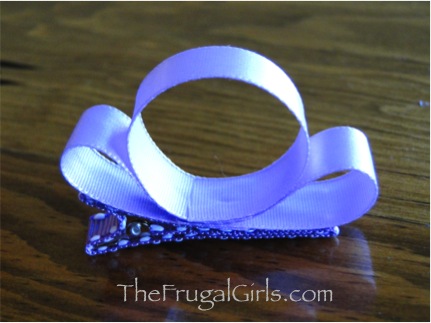
7. Just like we did above… now place a small dot of glue near the inner base of the loop, and gently press the top down, like this…

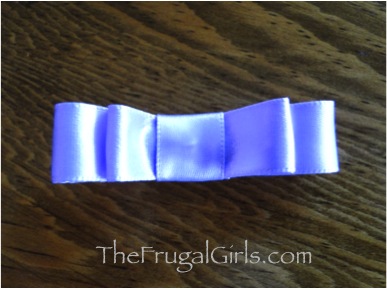
8. Now grab your little flat piece. This we’ll glue right around the center, with both ends hiding underneath the top of the clip.
Start like this… then just wrap it tightly around, and glue the other side where the ends meet (on the inside of the clip)…

It’s getting CUTE!!!
9. Now go grab a pretty embellishment or flower. I found a set of four cute little flower clusters for around $2 at Jo-Ann’s (near the ribbon).
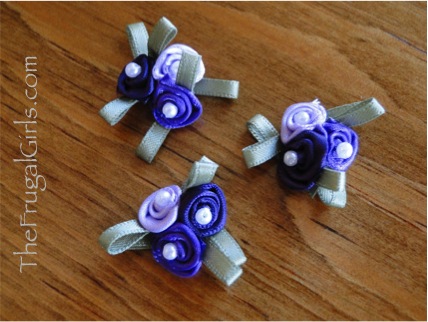
10. Glue your pretty little embellishment to the top middle piece of the bow…
All done ~ wasn’t that easy?? Now… go make some pretty little clippies and bows of your own! 😉
Double Bow Hair Clip Reviews
What Your Frugal Friends Are Saying About These Double Bow Hair Clips…
Lampica writes: “Awesome, great looking and not too hard to make. Great for daughters, or maybe as a homemade gift. Quite unique.”
Laura writes: “I am sewing Easter dresses for my granddaughters and made some of these hair clips to match their dresses!! I can’t wait to see them all dressed up!”
Racheal writes: “Love this!!! So glad I found this site. Now I can make the hair pieces for my flower girls and junior bridesmaids to match the wedding.”
Angie writes: “These make great gifts! I know because I got several as gifts for both my girls.”
Robbyn writes: “You can also glue fake flowers to these clips (as above) and clip them on headbands or crocheted beanies. Great way to get an expensive looking hair decoration on the cheap that you can change with every outfit.”
Kristin writes: “Here’s a way to make the clips non-slip! In the isle with the contact paper, they have a rubber type that you can use in your drawers. (It looks like little circles all joined together.) Cut that 2 circles wide, and 8 circles long. Attach that to the top part of your clip, and now they won’t slip out!! ENJOY!!”
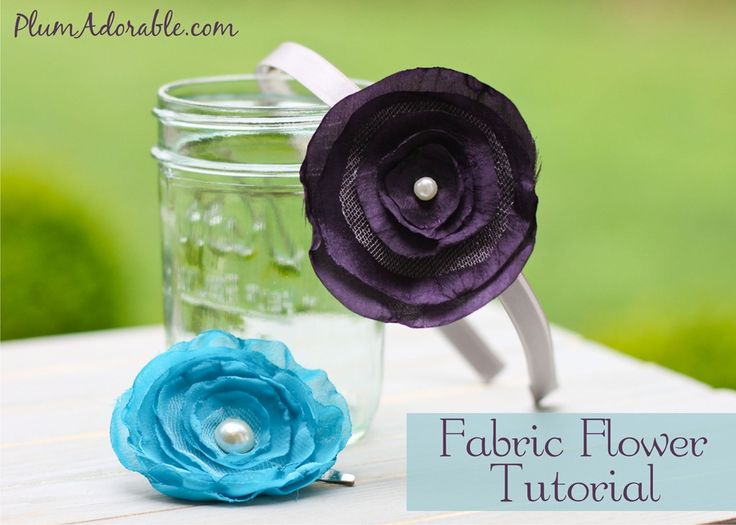
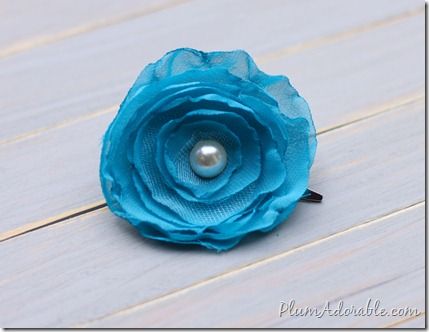
Fabric Flower Petals Hair Clip Tutorial
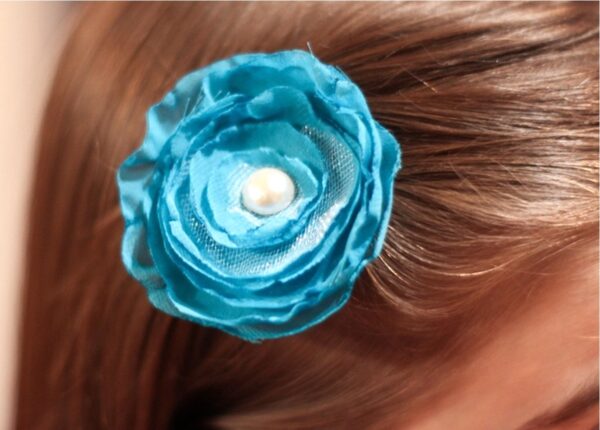
This pretty little fabric flower craft tutorial was submitted by frugal friends Jenny & Jess. ENJOY!
I’m going to show you how to make fabric flowers that can be used on a variety of things.
I realize there are lots of fabric flower tutorials out there as well, but these are very simple to make, yet look so elegant.
Fabric Flower Petals Hair Clip Supplies
Here’s what you’ll need to round up…
- Silky synthetic fabric (chiffon, taffeta etc.)
- A tea light candle or a lighter.
- Glue G*n
- Card stock (for circle templates)
- Scissors
- Felt circles
- Embellishments: tulle, pearls, feathers, beads, buttons,
- Optional for hair: headbands, clips, bobby pins
How To Make Your Flower
Just follow these simple steps…
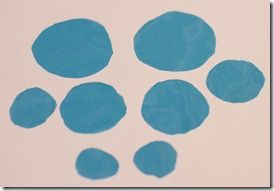
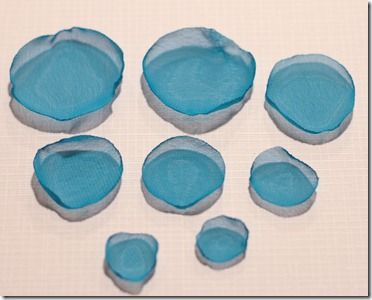
1. First cut out a template of 5 to 7 circles on card stock paper. I like my smallest circle to be 1 inch. Then I make each additional circle a 1/2 inch bigger than the next. (ex. 1in., 1.5in., 2in., 2.5in. etc…)
2. Depending on how big you want your flower use your template to trace and cut out your circles. If you use a dark marker, make sure you cut inside your marker line so that it doesn’t show on the fabric.
I usually make dots around the circle just to give me a visual of where to cut. When you cut out your circles don’t worry about them being perfect.
I also like to cut the same size circle two or even three times especially when I am doing smaller flowers. Since your circles are not perfect they will just add to the layering effect.
3. Next, take each fabric circle and put it close enough to the flame so that it starts to curl slightly. Turn your circle around until all edges are curled to your liking.
I suggest that you do a couple of practice ones first. Also, for safety, it’s best to do it over the kitchen sink with the water running.
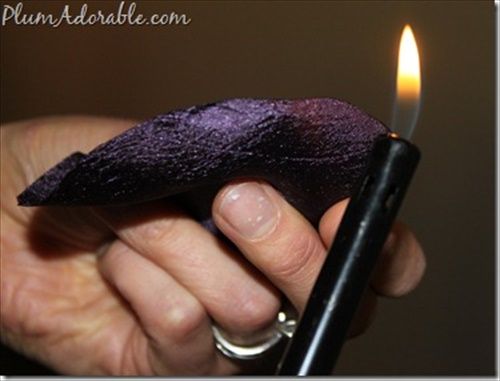
Are you wondering how I held the flower, lighter & took the picture? Yah, that’s not me. That’s my ‘hand model’ and friend Andrea. Thanks Girlfriend!
4. Once you have curled your edges they should look something like this. I ‘barely’ curled the edges for these flowers.
5. Next, start with the smallest circle and put a dot of hot glue onto the bottom/middle of it.
6. Then layer it inside the next biggest circle. Now take those two circles and add another dot of glue and layer it into the next circle. Continue until they are all glued together.
7. If you want to add tulle in the middle of a couple of the circles like I did with the one below, just add it to your layering steps.
8. You can embellish your flowers with pearls, beads or whatever else your little heart desires.
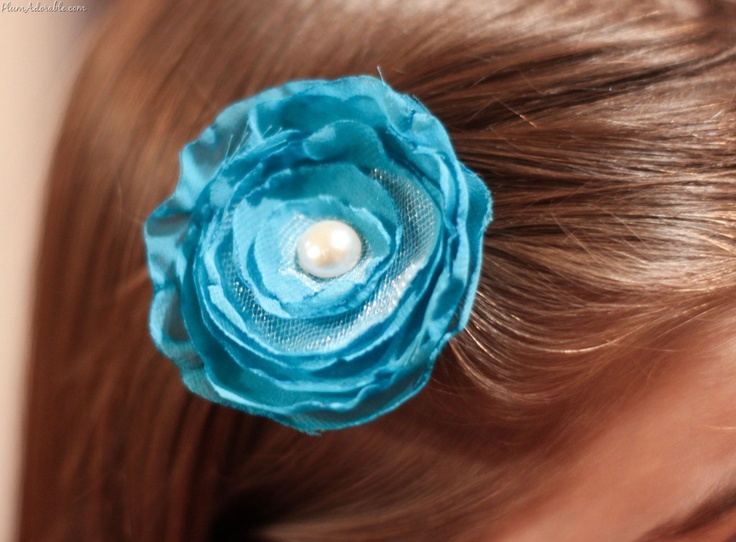
9. I like to attach alligator clips if they are going to be worn in your hair mostly because they are easier for my girls to put in their hair. You could also attach them to a flat back bobby pin or a headband.
If you do this it’s best to cut out two identical felt circles. Glue one felt circle to the flower and then glue it onto the top of the headband.
Take the second felt circle and glue it so that overlaps the underside of the headband and attaches to the felt one you glued on the flower so that it holds it in place.
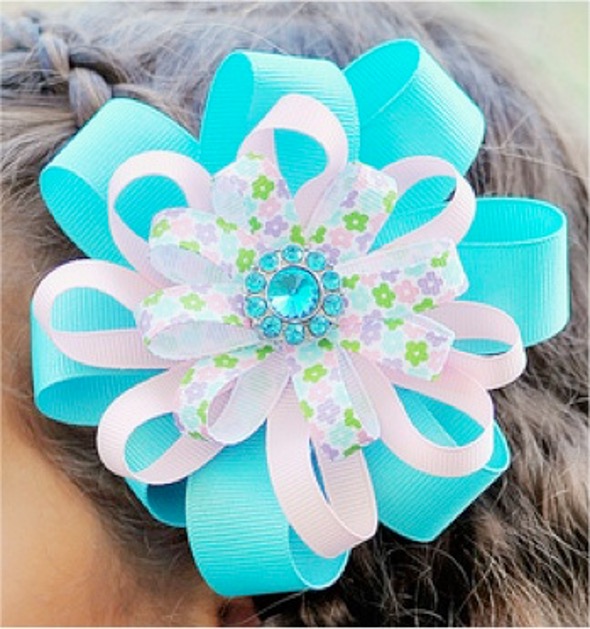
How to Make a Ribbon Flower Hair Clip
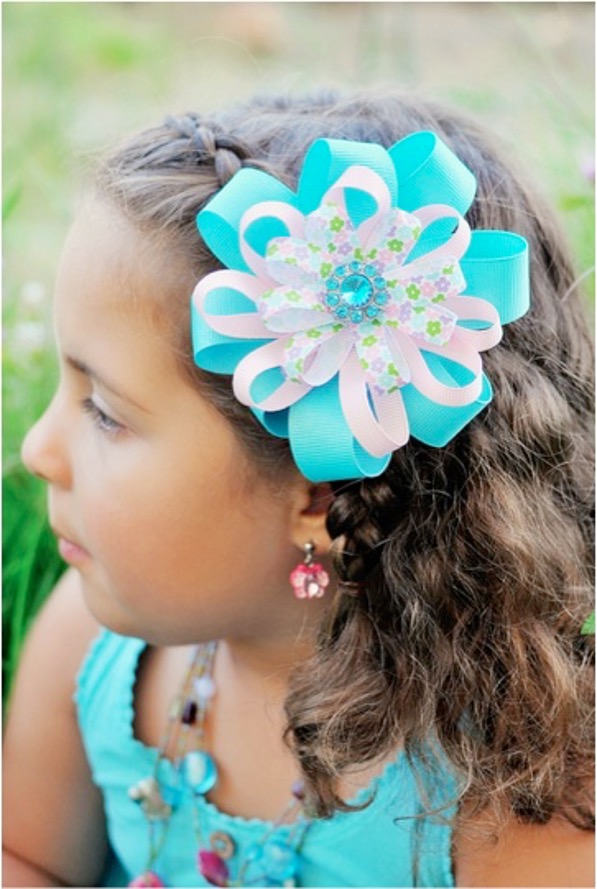
Frugal friends and sisters Brooke & Seasyn shared such a pretty flower hair clips!
She started with this tutorial from Domesticating Michelle, but then made the bow into 3 layers! Here’s what she said:
1. I used the tutorial for the base but made it into 3 layers….with varying ribbon thickness.
2. The thicker blue ribbon is cut at 10 inches, the thinner pink ribbon is cut at 7 inches, and the center decorated ribbon was cut at 5 inches.
3. I just followed the figure 8, gluing directions for each set of ribbon then stacked them on top of each other and glued….with the button in the center hot glued in place from my bag o’ buttons I had laying around.
Shautel writes: “I made 2 of these and will definitely be making more.”
DIY Hair Clips and Bows Organizer Ideas
Need a tidy and organized way to store all of your hair clips?
Don’t let those hair clips, bows, and ties taking over the bathroom counter!
Here’s a fun idea you can try. I painted an old frame a pretty metallic pink, removed the glass, put scrapbook paper over the cardboard, then added some thick ribbon from the Dollar Tree.
This works great if you’ve got just a few clips and bows… or a larger frame could be used for a bigger bow collection.

More Crafting Inspiration
Find even more fun hair tutorials, crafty hacks and storage ideas here…
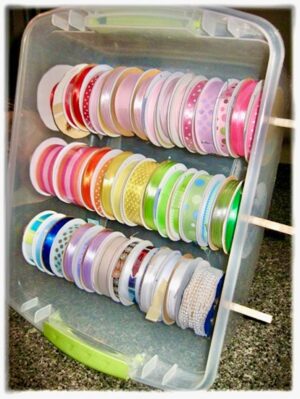
Ribbon Storage Ideas for Spools
Make sure your pretty ribbon is right where you need it with these easy Ribbon Storage Ideas for Spools! These simple tricks are such a game changer!
Fun Crafts To Do that Anyone Can Enjoy! (huge list)
Feeling crafty?? It’s time to get your Craft on and get inspired to do some fun crafts!
So have you tried any of these tutorials for DIY Hair Clips and Bows yet?
Leave a comment and share…


