Start creating your own adorable headbands with these easy tutorial for How To Make Cute Flower Headbands for Babies and Little Girls!
Then have even more fun when you learn how to make adorable bows and clips with some help from this BIG List of DIY Hair Clips and Bows!

![]()
How To Make Cute Flower Headbands for Babies and Little Girls
I’ve already shown you how easy it is to make cute hair clips for babies and little girls.
Now it’s time to learn How To Make Cute Flower Headbands for Babies and Little Girls!
Make some for your baby or little girl, or give some as thrifty gifts!
This fun project idea for How To Make Cute Flower Headbands for Babies and Little Girls comes from my friend Joli!
These are thrifty, quick-to-make, and seriously cute!
Here’s what you’ll need to get started…
Related: Fun Crafts To Do that Anyone Can Enjoy! (huge list)

Supplies Needed to Make Flower Headbands for Babies
You’ll just need a few simple things to make the CUTEST headbands for babies!
Check your craft supplies, or add the following to your shopping list to make sure you’ve got everything on hand…

- Stretchy, Soft Headbands (I got mine Free at Kohl’s with a coupon!)
- Silk Flowers (I paid around $1.00 for each flower bunch at Michael’s)
- Hair Clips (I found mine at Sally Beauty ~ ‘Salon Care Metal Clips’) I bought a box of 100 for $5.39, so they worked out to just 5 cents each!!
- Jewels or Buttons (can be found at any craft store)
- Hot Glue G*n

How to Make Flower Headband for Baby Girl
Here’s what you’ll do…
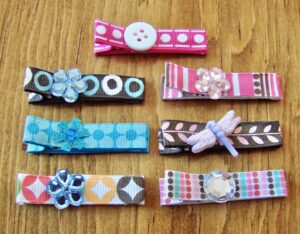
1. First we’ll start by making a hair clip, just like when we made the Cute Hair Clips for Babies and Little Girls!
2. Depending on the size of your clip, measure out the amount of ribbon you’ll need to cover both the inside and outside of the clip. For the clips I used, I needed just under 7 inches.

3. Now, go grab your glue g*n, and let’s get started!
4. I use the hot setting on my glue g*n. The lower temperature glue won’t work well, so make sure it’s hot… but no burning fingers, okay?? 😉

5. Begin by gluing the ribbon to the lower inside portion of the clip. Pinch the clip open while gluing, and be careful to keep the ribbon straight!

6. Then, add some more glue to the back of the ribbon, and wrap it around to the bottom side of the clip. Make a nice crease at the point of the clip.

7. Add some hot glue on the inside of the clasp, and glue ribbon.

8. Then, add hot glue to the remaining amount of ribbon.

9. Pinch clasp, and wrap all the way around and under. Again, make a nice crease at the point.

You did it ~ now you’ve got a super-cute clip!
I told you this was going to be easy!!
Now… on to the flower…
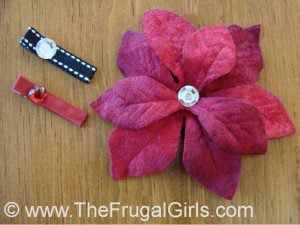
10. First, remove flower from stem, then remove all plastic parts from the front, back, and check between the petals, too.

11. Now, add a smidge or little circle of hot glue in between each layer of petals, to glue the layers of flower petals together.

12. Once the glue has dried, glue on a pretty jewel or button to the center. Sooooo cute!

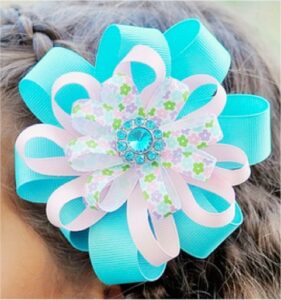
13. Now, go grab your clip, and add some hot glue onto the top of the clip.

14. Then, attach the bottom of the flower to the glue on the top of the clip. Cuteness!

15. Now… you can use this as a fun Flower Hair Clip just as it is… like these Christmas Hair Clips and Valentine’s Day Hair Clips!
Or… after the glue has dried, simply attach the clip to the headband of your choice.

I attach them near the seam of the headband, to hide it. 😉

Good job… you did it! Wasn’t that easy??
16. Have fun experimenting with different colors, layering flower petal colors, and jazzing them up with pretty jewels or buttons.

You can also vary the size of the flowers!
And… don’t forget ~ these are interchangeable, so you can attach different flowers to different headbands!

This is definitely a quick project, and these make great thrifty New Mom Gifts, too!
How Much Did it Cost?
- Hair Clips (Box of 100 for $5.39 at Sally Beauty Supply) = 5 cents each!
- Flowers ($1.00 per bunch at Michael’s)
- Jewels ($2.99 for pack of 55 at Michael’s)
- Headbands (I got these Free at Kohl’s with a coupon)! Regular Price: 6-pk. for $6
- Total Cost per headband: About $1.10 ~ $2.10 each!!
More Creative Craft Ideas
Want even more fun craft inspiration? Be sure to check out these fun craft ideas…
How to Make Cute DIY Hair Clips for Babies and Little Girls
Let me show you how to make Cute Hair Clips for Babies and Little Girls!
How to Make Korker Hair Bows
Learn how to make Korker Hair bows with this easy DIY tutorial!

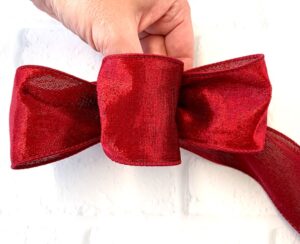
How to Make a Bow For a Wreath
Wondering how to make a bow for a wreath with wired ribbon? This simple step by step tutorial will show you just how fast and EASY it can be!
DIY Hair Clips and Bows (Easy Tutorials)
You’ll love this BIG List of Fun DIY Hair Clips and Bows. They’re SO easy to make, and make super-cute gifts, too!
Fun Crafts To Do that Anyone Can Enjoy! (huge list)
Feeling crafty?? Get inspired with these easy and fun crafts to do at home!
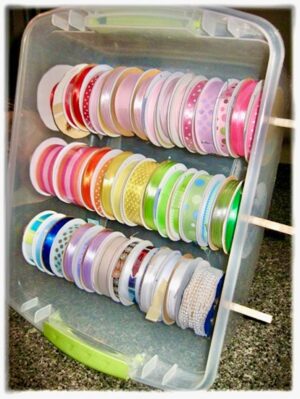
Ribbon Storage Ideas for Spools
Make sure your pretty ribbon is right where you need it with these easy Ribbon Storage Ideas for Spools! These simple tricks are such a game changer!
So have you tried these tips for How To Make Cute Flower Headbands for Babies and Little Girls yet?
Leave a comment and share…


Beautiful! Thanks 🙂 You have some of the greatest crafts that are super easy and cute! I appreciate everything you do 🙂
Aww ~ thanks, Melissa! 😉
~ Heidi
Definitely imagine that that you said. Your favorite reason seemed to be at the internet the simplest factor to take into accout of. I say to you, I certainly get annoyed at the same time as other people think about issues that they plainly do not realize about. You controlled to hit the nail upon the highest and outlined out the whole thing with no need side effect , other folks could take a signal. Will likely be back to get more. Thank you
To help keep the glue bulk down to a minimum . I used paper brads (the brass ones) on the center and then glues my jewels to the top of the brad. I have lots of girls (6) so my time was limited and could make several flower bows in seconds. Thank you for sharing!
I love these and have always wanted to make them so I was super excited when I found this but one question I have is how wide is the ribbon or does it matter? I picked up a few different sizes but I’m so particular I just want to make sure I get it right! 🙂 and thank you!
Hi Lindsey ~ I use 3/8″ ribbon for the clip, but you can also experiment with different widths! 3/8″ is my favorite… but 5/8″ should work, too! Have fun making your hair bows! 😉
~ Heidi
I love making these! Just wanted to say that I’ve discovered some of my flowers get really floppy and lose their shape over time if I take out all the plastic parts between the petals. If I leave the plastic parts in (and still glue between each layer, they seem to maintain their shape for a lot longer!
I have read to use spray starch on finished bows so maybe that would work for the flowers too.
Love this..thanks for sharing!
thanks it was fun and easy and im only 11
You’re very welcome, Megan! I’m so glad you had fun making them! 😉
~ Heidi
I am so excited about making the hair clips. I cannot wait to get started.
Thanks!
Great post! Thanks for the great pictures! I want to make these for my 2-year-old and 4-year-old daughters.
thanks for posting this tutorial. I was searching all over for instructions so I wouldn’t mess it up. Thanks!!!