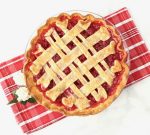
Fresh Raspberry Pie Recipe! {Easy Homemade Pie}
Enjoy more of your favorite sweet and tart berry when you make this irresistible Fresh Raspberry Pie Recipe!
Servings: 8
Ingredients
- 6 cups Fresh Raspberries rinsed - approx. four 6 oz. containers - {frozen raspberries thawed and drained can be substituted}
- 2 tsp. Fresh Squeezed Lemon Juice
- 1 cup Granulated {White} Sugar
- 4 tbsp. Cornstarch
- 1 Egg
- 1 tbsp. Cold Butter cut into tiny pieces
- 1 tbsp. Milk
- 1 pinch Salt
- 2 tsp. Turbinado Sugar {Sugar in the Raw} - for Pie Crust Topping
Instructions
- Preheat oven to 425 degrees.
- Carefully place one pie crust in 9″ pie dish. Trim and fold edges over, and crimp, pinch, or flute now if you'd like... or flute later if making a traditional full-lattice. {see notes for lattice tips}
- Beat egg in small bowl, and brush inside of bottom crust with beaten egg… this will prevent it from becoming soggy while baking. Once done, set remainder of beaten egg aside for later.
- In large bowl, stir together Raspberries, Granulated Sugar, and Cornstarch until well combined and you no longer see any white coating.
- Transfer raspberry mixture into pie crust in dish, leaving any excess liquid in the bowl.
- Drizzle lemon juice over top of the berry mixture.
- Dot with pieces of cold butter.
- Then brush edges of pie crust with water. This will help the top crust stay in place.
- Lay out your top pie crust as desired. {see notes for tips on creating a lattice and fun designs}
- Now it’s time to for the egg wash. Grab the reminader of your beaten egg you used earlier, and add to it 1 tbsp. Milk + a pinch of salt, then stir well. Dip your pastry brush in the egg mixture, and brush over the entire top and outer edges of your pie crust.
- Evenly sprinkle top of crust with Turbinado Sugar.
- Place pie on cookie sheet {it will catch any potential spills that bubble ever}
- Bake at 425 degrees for 15 minutes.
- After 15 minutes, add your Pie Crust Shield to keep the edges from burning, adjust temperature to 375 degrees, and bake for 45 – 50 more minutes, or until done and top crust is golden brown.
- Transfer to a wire rack and cool for a minimum of 3 hours prior to serving. I like to wait even longer to allow all that raspberry gooey goodness plenty of time to solidify.
- Slice and serve up with big scoops of vanilla ice cream. ENJOY!
Notes
Lattice Pie Crust Tips:
- When it comes to making pies, designing the top crust design is one of the best parts!
- Make sure to leave adequate holes or gaps for venting.
- I like to roll it the top pie crust out on cutting board and slice dough strips using my pizza cutter. Or for crimped edge strips, use a ravioli wheel.
- You can slice uniform sized strips for a traditional lattice or a variety of sizes for a fun visual effect.
- If you'd like to create braids, simply cut three thin pieces, press together at the top, and braid them. They can add some pretty additional texture to your lattice.
- Once you've cut your strips, it's time to weave your lattice pattern.
- If Weaving a Traditional Lattice: I like to cut 10 uniform strips of crust. Place 5 strips down vertically, evenly spaced, allowing edges to hang over sides of the dish. Then carefully lift every other one back up so you can place 1 horizontal strip down underneath, allowing edges to hang over sides of the dish. Lay the vertical pieces you lifted up back down, and now you'll see you've started the weave. Now lift up every other vertical piece you didn't life up last time, place down another horizontal strip, and lay vertical pieces back down. Continue process until you're done. Once done, carefully trim off all edges hanging over with a small sharp knife. Gently press strips down where they connect around the edge of the dish with the bottom crust. Now carefully lift up at the edge and flute using your left pointer finger to push in, and you're right thumb and right forefinger to push back, creating wavy edges.
- If you have enough leftover pie crust, you can even cut out little shapes with Pastry Stampers or miniature cookie cutters to add some fun designs to the crust!
- Most of all... just have fun with it. The options really are endless!